
DeepVocal Editor Tutorial - Using the DeepVocal Editor
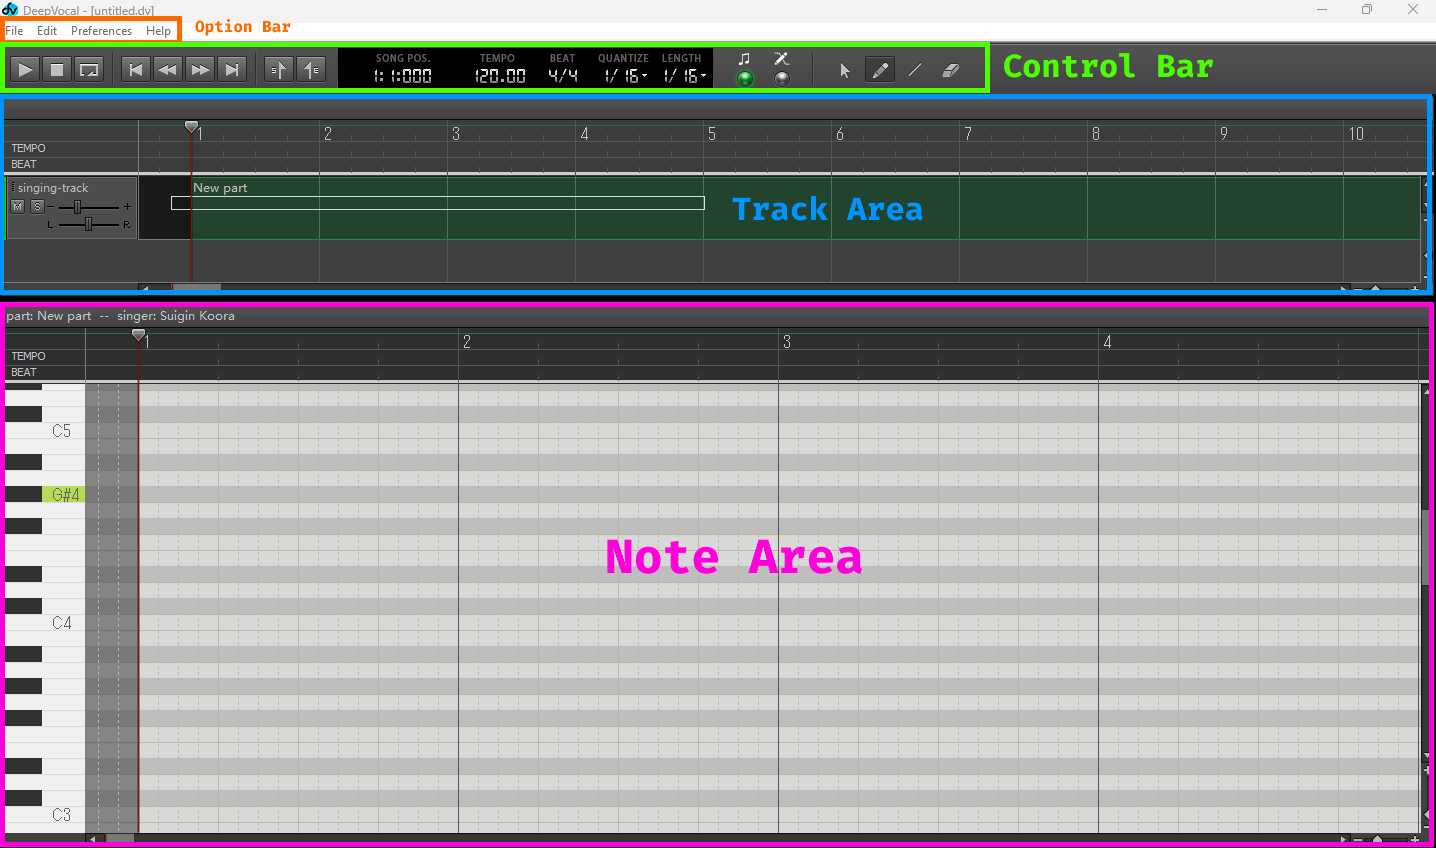
This diagram is a map of theDeepVocal software and will be referenced later! I don’t know if these sections have actual names, so these are what I call them.
Before the tutorial, I want to suggest that you make your sequence files (.dv in DeepVocal, .ust in UTAU, etc.) in something other than DeepVocal. You can definitely make them in DeepVocal, but it is very tedious. I recommend using OpenUtau or SynthV to make the tracks and then converting them with UtaFormatix. When doing so, make sure the output lyrics according to the singer’s documentation (romaji is a safe bet for Japanese) and to switch + (or other note-extending phonemes) to - since that’s what DV uses. You’ll likely need to make some modifications in the editor anyway, so let’s get started with the tutorial.
DeepVocal’s editor isn’t very different than most other interfaces from vocal synths but I want to document it in case anyone needs help!
Menu Descriptions & Information
Control Bar
I’m starting with this since I think it’s pretty important. It’s where you change information about the song as well as change how you’re editing it. It’s the green part of the diagram. I think it’s best to think of it in 3 sections (listed from left to right):
Playback Control:
Startbutton: Starts playbackStopbutton: Stops playbackLoopbutton: Makes the playhead return to the start of the file once it reaches the end of notesGo to Startbutton: Jumps to the start of the first measureGo 1 Measure Leftbutton: Goes to the start of the previous measureGo 1 Measure Rightbutton: Goes to the start of the next measureGo to Endbutton: Jumps to the end of the longest track of the fileLoop Start Pointbutton: Places a point on the track that the playhead jumps to after theLoop End PointLoop End Pointbutton: Places a point on the track that, when reached by the playhead, sends the playhead to the `Loop Start Point
Song Control:
SONG POS.: Indicates the time of the track that the playhead is atTEMPO: BPMBEAT: Time Signature
Editor Control:
QUANTIZE: Increments at which notes can start and where you can drag parts and audio filesLENGTH: Increments for length when writing notesMode Selector(Section)MUSIC SCORE MODE: Selected to edit notes, tracks, and pretty much everythingPARAMETER EDITOR MODE: Selected to edit a track’s parameters (in the note editor, see below)
Tool Selector(Section)Arrow Tool: Select notes and tracksPencil Tool: Create notes and tracksLine Tool: Create lines in the note editor when using thePARAMETER EDITOR MODEEraser Tool: Delete notes and tracks
Track Area
The track editor is the upper window, blue in the diagram above. It’s where tracks of notes and audio are placed and where singers are selected. You can expand the section by clicking and dragging the black bar between it and the note area if you want to.
Editing tracks
Tracks
To create tracks, just right-click below the existing tracks (there is 1 by default) and click Create Track. Make sure you are in MUSIC SCORE MODE, otherwise it won’t let you. To delete them, select the grey box on the left of the track (with the name and volume) and then right-click and select Delete or press the delete button on your keyboard.
On the left side of the track area, you can see that each track has a grey box. Its parameters are the same as all other vocal synths I’ve seen (name, mute, solo, volume, and pan), which can be changed bu clicking buttons or right-clicking the box.
Parts
To make a part on the track (the containers of notes), use the Pencil Tool and select the region where you want to place the part. To remove them, click on them using the Eraser Tool. Double-click to select and start placing notes!
Importing audio
To import audio files (such as instrumentals, singing, or effect sounds), flick on File in the option bar (orange box in the diagram) and then Import instrumental, and then select any .wav or .mp3 file. Note that UtaFormatix doesn’t convert audio files correctly, so there will just be empty tracks that will need to be deleted and you’ll need to re-add the audio tracks.
Selecting singers
Select a part by left-clicking it while using the Pencil Tool or the Arrow Tool, then right-click it and hover over singer, then select the singer for that part.
Note Area
This is the section that you’ll interact with most when making and editing sequence files. It’s where notes are placed, edited, and deleted, as with most vocal synth software, but it has some quirks.
Note placing
Make sure that your QUANTIZE and LENGTH values are set to things that make sense for your song (they’ll probably need adjustment at some points) to make editing easier. Select the pencil tool, and start drawing notes! This part works the sane as Vocaloid 4’s editor.
Lyrics
To edit lyrics, double-click the note and type, same as with pretty much every editor, but there are some DV-specific behaviors.
Special note: 0
When you have a note with the lyric “0” (the number), it acts as silence. This is needed often, as for some reason DeepVocal connects notes that are close to each other without pausing. I try to keep them at a pitch that’s lower than the rest of the song so that they’re visually separated, but that’s just a preference thing. This is also useful as an extra phoneme, like a glottal stop. This also happens if you use phonemes that aren’t in the voicebank.
Special note: -
This phoneme is used to split a phoneme across multiple notes, same as + in OpenUtau. Very useful for notebending-style tuning!
Spaces
If you enter a space into a note, it will split the entered text into pieces by the spaces across notes. For example, if I have 3 notes (connected or with spaces) and enter sa ku ra, the 3 notes will become sa, ku, and ra since they were following the first note.
Dictionaries
Some voicebanks come with an optional dictionary, which makes entering lyrics easier for some languages (such as Japanese). If you enter a word defined in the dictionary, 2 things can happen.
Multi-syllable Word Behavior
While I haven’t made anything that uses this feature, according to the DeepVocal Wikia Dictionary Page, entering a lyric into a note that’s in the dictionary as being multiple syllables will split that note into multiple pieces. I don’t think many voicebanks have this feature, but it’s good to keep in mind.
Aliasing Behavior
For an example with a hiragana dictionary, if you enter か into the note, the dictionary would convert it to ka and the note would display か[ka] to show what it converted to.
Parameters
The DeepVocal note editor has multiple parameters that can be applied to notes, most-frequently-used is the pitch parameter for tuning/pitchbends. To do this, use the PARAMETER EDITOR MODE and select the part with the notes you want to edit. In the upper-left corner of the note area, there are 2 drop-downs. The left (with the pencil) is the one you are editing, and the right (with the eye) is the one you are viewing. Viewing and editing the parameters is similar to CeVIO and VoiSona, where they are overlayed onto the note area. They both say Null by default, meaning you’re editing and seeing neither of them.
Here’s a list of the different parameters and what they do, to my understanding:
| Parameter | Type | Effect |
|---|---|---|
Volume |
Curve | Changes the volume of the voice along a curve |
Pitch |
Curve | Changes the pitch of the notes along a curve - used for pitch-pen-style tuning |
Breathiness |
Curve | Makes the voice sound more/less “breathy” - increases/decreases the amount of noise (fricatives, breath) in the voice |
Gender |
Curve | Changes the formants of the voice to make it sound more “masculine” or “feminine” - higher values are deeper and lower values are lighter |
Phoneme |
Sliders | Allows adjustment of phoneme timing |
Timbre |
Drop-down | Select notes to change what pitch the sample is from (does nothing on mono-pitch voicebanks) |
To edit them, use the Pencil Tool to draw curves or the Line Tool to draw perfect lines. use the Eraser Tool and select an area in order to reset the section.
In addition to these parameters, you’re able to edit each note’s attack and vibrato by clicking the wedge-shaped and flat/sine-wave-shaped lines under each note à la Vocaloid. These just act as predefined curves to the Pitch parameter, but are handy. The names of the default ones are only in Chinese.
Option Bar
The option bar (orange, in my diagram) is pretty self-explanatory. Here’s a list of the functions in case anyone needs it:
File:New File,Open File,Save,Save As,Import MIDI,Import Instrumental,Export(Mixdown to file,Export each track)Edit:Undo,Redo,Switch edit mode,Switch edit/view parameter,Arrow tool,Pencil tool,Line tool,Eraser toolPreferences:Vibrato preferences,Portamento preferences,Set default symbol,Auto backup settings,Grid line,Return playhead to play position to start position on stop,Language settingHelp:About DeepVocal
These are all pretty easy to understand, but here are some that I think need extra notes
Export:Mixdown to filecan export.wavfiles and.mp3files, very handy for sending them to people since.mp3s are smaller.Export each trackcan only export.wavfiles.
EditSwitch edit modedoes the same thing as switching betweenMUSIC SCORE MODEandPARAMETER EDITOR MODE
Editing Preferences
DeepVocal’s GUI has issues with its preferences. Due to it installing to Program Files (x86) by default, it can’t write to the config file, so you need to edit it manually or run DeepVocal.exe as administrator. When running it as administrator, just change the settings (language settings requires the program to be restarted). I find that process annoying, so the next page of the tutorial is specifically about modifying the config files (the tables aren’t here due to my site not allowing a table of contents and wide page at the same time).
Making a Project file
As soon as you open DeepVocal, save the file to wherever you want it to be. Without doing this, you won’t be able to use backup files if the editor crashes, so do it before you even make tracks!
That’s the end of the tutorial, have fun with DeepVocal! Make sure to save often, this software crashes quite frequently.
Next Step: Editing Preferences (Optional)